Friday, August 14, 2009

Refrigerator Kolaches

(from top right going clockwise: apricot, poppyseed, strawberry, blueberry, cherry and prune)


Kolaches were my first attempt at working with yeast. When my Mother passed away in 2003, it occurred to me that there would be no one left in our family to make kolaches. I wasn't particularly worried about the recipe because I made it a personal mission to find one that would work for me. It was more important that the actual "act" of making kolaches lived on. Well, I tried several different recipes but because of my schedule, I didn't have hours upon hours to make them from start to finish. I happened upon the following recipe which allowed me to make my dough the night before and let them raise overnight in the fridge. The next day I could scoop, raise, fill and bake. This was perfect for me. I've made them MANY times! My hubby says they taste great even a couple days after being baked. So that he can enjoy them over a period of time, I normally will bag them up, with a couple of them in each sandwich bag, put them into a freezer bag and then pull them out as desired for breakfast.

Refrigerator Kolaches
From “Recipes from the Heart" – Salem United Methodist Church, C.R., IA – Pat C.

Ingredients
1 cup warm water (105 – 115 deg)
3 pkgs dry yeast (3 tbsp bulk)
2 eggs (well beaten)
1 cup sugar
½ cup Crisco (melted)
2 tsp salt
7-8 cups flour
1 cup mashed potatoes (nothing added)
1 cup potato water

Directions
Dissolve yeast in warm water. Mix sugar, eggs, Crisco and salt. Add yeast and 4 cups flour. Beat in potatoes and potato water. Beat for 5 minutes. Work in the rest of the flour; knead well and placed in a well-greased bowl. Brush top with melted butter and refrigerate overnight. In the morning, shape the dough in walnut size balls and place on a well greased baking sheet to rise. After double in size, flatten in the center and fill with your favorite filling and let rise again. Bake at 400 deg until brown, 18-20 minutes.

My comments:
1) If I don’t have mashed potatoes handy I’ve used instant potatoes with good results.
2) I’ve used evaporated milk for the potato water.
3) Make sure the warm water is NOT too hot. If it is you will kill the yeast and have to start over.
4) This dough is equally good for cinnamon rolls!

5) Don't use airbake pans with these. They don't brown on the bottom.

6) Using a medium scoop I get 5-6 dozen kolaches per batch.

7) Here is how many I get from each can of fruit: apricot (19), strawberry pie filling (22), poppyseed (19), cherry pie filling (26), blueberry pie filling (30), prune (17).

8) If using pie filling - I always strain the "goo" out of the fruit. You can then add back in what you need to get it to the desired consistency.

My shortcuts
1) Use your electric mixer with the bread hook to do the work. I’ve used my Kitchen Aid mixer ever since I started making these 6 years ago!
2) Use your cookie scoop for scooping the dough. The size is uniform and it is much quicker then rolling each one in your hands.


This is the way the dough looks the night before. You cover the bowl with plastic wrap and put it in the fridge. The below picture is what it looks like in the a.m.!


I then use a medium cookie scoop to form the balls. I have three sizes which I've gotten from Pampered Chef. For your info the large scoop is equal to 3 TBSP, the medium scoop is equal to 2 TBSP and the small scoop is equal to 1 TBSP.


Be sure to place the dough on a well greased pan with adequate room between each. They are going to double in size.


This picture shows the before and after of the risen dough balls.


Scoop all your dough balls onto your pans. Normally by the time you have the last ones scooped the first pans will be adequately raised that you can start filling them.


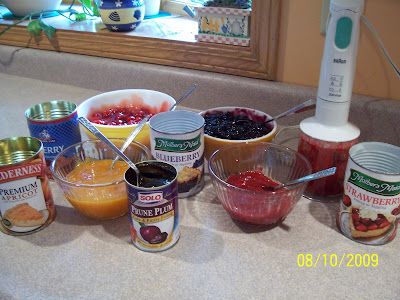
Get all your fillings ready. In this instance I made a double batch which is why I have so many filings laid out. To save money you can use pie filling but you'll have to chop it down with a food processor or food chopper so the fruit will go further.


One pan at a time, start forming your kolaches and add the filling. Once again, by the time you get done with the last pan the first pan should be ready to go into the oven.


Make sure you watch these carefully. The longer I bake the shorter my baking time. Also, different types of pans bake differently.


Alot of kolache bakers brush butter on the dough after they come out of the oven. They also like to put a sugar/flour crumble mixture on top. Both of these make the kolaches look "pretty" but in my book the extra calories aren't "worth wearing"! They taste just great "as is".


Sunday, August 9, 2009

Swiss Steak and Slow Cooker Cobbler

I usually have a plan when I make a meal. Today I needed to accomplish two things. First I had to have something that I could put together ahead of time and not have to mess with till just before eating time. Secondly, I needed some mashed potatoes to use in my kolaches that I'm mixing up tonight. I normally use instant mashed potatoes but decided to go with the real thing this time.

Dinner was to be served around noon so at 8:30 I started on the main course - the Swiss Steak. I had seasoned it with garlic pepper (which I use on everything I can) last night so it was in the fridge ready to go. I dredged it in flour (with more garlic pepper) and browned both sides in my electric skillet. I was doubling the recipe so I had to brown the meat in batches. While the meat was browning I put baby carrots in the bottom of my pan, laid the meat on top as it came out of the skillet and the scattered the sliced onions all over the top. After pouring the water/Worcestershire sauce over everthing, into the oven it went for 3 hours. Hubby peeled, cleaned and cut up the potatoes so they were ready to turn on at 11.


Sunday dinner isn't complete without dessert. Unlike the Swiss Steak recipe which is tried and true (many times over), I opted to try something new for dessert today. I had picked up Taste of Home - Potluck, which was new on the newstands. This dessert was to be made in the slow cooker and it had only four ingredients. The recipe called for using cherry or apple pie filling, but because I had 5 cans of blueberry pie filling in my cupboard I decided to go that route. I'm giving you the recipe exactly as it was printed with my variation following.


Here are the recipes:

So Tender Swiss Steak
From Taste of Home, Annual Recipes (2000)

Ingredients
¼ cup all-purpose flour
½ tsp salt
¼ tsp pepper
2 pounds round steak, cut into serving size pieces
2 tbsp vegetable oil
1 medium onion, thinly sliced
2 cups water
2 tbsp Worcestershire sauce

For the Gravy:
¼ cup all-purpose flour
¼ tsp salt
1/8 tsp pepper
1-1/4 cups beef broth or water

Hot cooked noodles or mashed potatoes, optional

In a shallow bowl, combine flour, salt and pepper. Dredge steak, a few pieces at a time. Pound with a mallet to tenderize. In a Dutch oven, brown steak in oil on all sides. Arrange onion slices between layers of meat. Add water and Worcestershire sauce. Cover and bake at 325 degrees for 2 to 2-1/2 hours or until meat is very tender. Remove to a serving platter and keep warm. In a small bowl, combine flour, salt, pepper and broth until smooth; stir into the pan juices. Bring to a boil over medium heat; cook and stir for 2 minutes. Serve steak and gravy over noodles or mashed potatoes if desired. Yield: 8 servings

My variation – I use minute steak (cheaper grade but already tenderized). I cut the onion into thick slices so I know when I’m eating them.

I put carrots in the bottom of the pan, cover with the browned meat, arrange the onion slices and then bake. I wanted a longer baking time of 3 hours so I reduced my temp to 300 degrees.


Slow Cooker Cobbler - the official name in the magazine - Minister’s Delight
So named by the contributor because it originated from a minister’s wife who was said to fix it every Sunday.

Ingredients
1 can (21 oz) cherry or apple pie filing
1 package (18-1/4 oz) yellow cake mix
½ cup butter, melted
1/3 cup chopped walnuts, optional

Place pie filling in a 1-1/2 qt. slow cooker. Combine cake mix and butter (mixture will be crumbly); sprinkle over filling. Sprinkle walnuts if desired. Cover and cook on low for 2-3 hours. Serve in bowls.

Variations:
I used blueberry pie filling as I stated earlier. And because I always try to make things a “little bit” healthier I used Smart Balance instead of butter. I used more then the 1/3 cup walnuts – as I’ve always believed the nuttier then better! I served it warm with vanilla yogurt ice cream. Very easy and everyone enjoyed it a lot!

Friday, August 7, 2009

Cake Balls


Where did these things come from? How come I've never heard of cake balls before? My sister Patty made these for the first time several weeks ago. I didn't get to try them at that time but heard all about them. Everything about them sounded wonderful and I was anxious to taste them. And then last weekend Patty made a batch of them to take to work for a food day and fortunately for me, she sent some home with my daughter Becca! They are soooo good! One of the things I really like about them is that they are bite size and you can easily control how much you eat. Whereas if someone else is cutting a cake, you get what they cut you. With these you get to decide how indulgent you want to be. The other wonderful thing about them is the versatility. The ones Patty made were with a German chocolate cake mix and the associated German chocolate frosting (ready-made in the container with the coconut). There are so many variations . I'm going to give you some of the results of my research. I found lots of websites and blogs that discuss this little wonder and many of them date back a year ago or further - which is why I'm surprised I'm just now discovering them.


FYI - just to prove how tasty and popular these treats can be, you'll be interested to know that someone actually started a business making them. You need to check out their web site to see all the variations and decorations they use. It will give you some ideas. The address is http://www.cakeballs.com/ . The get a pretty penny for them but they make them in the size of golf balls!

The basic recipe is one of the easiest I've ever seen:

Cake Balls

Ingredients


1 (18.25 oz) cake mix (or homemade cake of your choice)
1 (16 oz) container prepared frosting (you may not want to use the whole thing)
1 (3 oz) bar of flavored confectioners coating or almond bark (white or chocolate)

Directions

Prepare the cake mix according to the directions using any of the recommended pan sizes. When the cake is done, crumble while warm into a large bowl, and stir in the frosting until blended. (Another option is to let the cake cool and stir in warmed frosting.)

Shape into 1 inch balls by hand or using a small cookie scoop. Place on a cookie sheet and freeze until solid. Minimum 1-3 hours.

Melt confectioners coating or almond bark in the microwave, or in a metal bowl over a pan of simmering water, stirring occasionally until smooth. Dip cake balls into coating mix and place on a cookie sheet to let coating set. (You can use a fork, toothpick, dipper from Easter egg dye set, egg separator, etc.) If you are using any type of sprinkles for decoration you need to get them on the cake balls BEFORE the coating hardens. You can also decorate them with a contrasting color of coating. Put the melted coating into a freezer bag, cut the corner off the bag and sqeeze squiggly lines over the balls.

Refrigerate the cake balls until ready to serve. Makes 60-75 balls.

Variations:
German chocolate cake/German chocolate frosting/chocolate coating
Devils food cake/fudge frosting/dark chocolate coating
Yellow cake/buttercream frosting/vanilla coating
White cake/white frosting mixed with colored sprinkles/chocolate coating
Spice or carrot cake/cream cheese frosting/vanilla coating
Chocolate cake/vanilla frosting/mint flavored coating tinted green
Lemon cake/lemon frosting/vanilla coating
Funfetti cake mix/white frosting with rainbow colored jimmies/colored white coating
Devils food cake/cream cheese frosting/chocolate coating
Strawberry cake/strawberry frosting/chocolate coating
French vanilla cake/white chocolate frosting/chocolate coating
Red velvet cake/cream cheese frosting/vanilla coating
Cherry chip cake/cream cheese frosting/vanilla coating
Chocolate cake/chocolate frosting with chopped Andes mints/chocolate coating

If you go to http://www.allrecipes.com/ and search for cake balls you will find the recipe there also. There also alot of comments from people who have made these and many have practical suggestions on how to make the process easier. After you make them a couple times you'll be an expert yourself. This will be your "go to" recipe when you want to take something to a family dinner or potluck and impress the heck out of everybody there.

Sweet Potato Fries

Periodically I run into a new food item that absolutely makes me giddy! Sweet potato fries are one my most recent finds. I just LOVE them! What makes this incredible is that I don't like sweet potatoes. My daughter Becca brought some home from a restaurant a couple months ago and insisted that I try them. OMG! The fact that they were quite tasty PLUS they are very good for you makes them over the top! Since that time I have bought a couple bags of the local store's brand of sweet potato fries and been quite happy with them.

I know I haven't mentioned this yet but my hubby and I come home for lunch everyday. Isn't that awesome? We work together so it is pretty easy to do. I have 30-35 minutes to throw our lunch together and because we like our biggest meal to be at noon it can sometimes be a challenge. I have a lot of shortcuts that I use that I will share over time. We try to eat as healthy as possible so what I share with you will be with that in mind. (And yes, convenience foods do play a role in my "quick meals".)

Today we had Angus burgers that I bought at Sam's Club (Quick'N Eat Fully Cooked Choice Angus Patties - 12 ct pkg). They are in the frozen foods section and cost $13.88 a package which is a little over a dollar a piece - which is a good price for a very filling sandwich. They heat up in the microwave in just a few minutes. And the nutrition isn't too bad. They are only 230 calories per burger and the protein is 26g. They taste like they just came off the grill. I teamed these up together with the sweet potato fries for our lunch today and walked away quite satisfied! No dessert needed!

Thursday, August 6, 2009

Thoughts on food blogging

I find myself thinking ALOT about the whole food blogging thing. I've been reading alot of them that are "out there" and really appreciate what they have to offer. I'm hoping that 6 months down the road I'll be able to look back and see that I have documented my cooking/baking journey in such a way that it was worth reading. I was thinking last night about Chelle's blog and how she talks about the races that she has coming up and then posts racing reports after they are done - this isn't that much different. I can anticipate the things I'm looking forward to cooking and then reflect on what I've done after the fact.


Having said that...what am I looking forward to? I will be making kolaches for Aid to Women (an organization I volunteer at). They are having a fundraising golf tourney next week and I'm making kolaches for the kick-off breakfast. After the golfing event is over the golfers will have dinner ready for them. I will be helping with the dinner preparations and serving - but I'm not responsible for any of the planning of that. And then the next food event I'm looking forward to is the following weekend. Chelle and friends are coming into town for a race in Palo and I'm making the dinner that is following it. Chelle gave me the menu so I didn't really have to give much thought to that part of it. (Sounds to me like it pretty much has all the things that are Chelle's favorites!) The menu consists of grilled pork chops, Italian potatoes, broccoli grape salad, corn on the cob and strawberry pretzel dessert. All are things I've made many times before and will glady make again as they are favorites of mine also!


I'm planning on taking some pics and posting recipes after each of these baking/cooking events so there is more to come.

Sunday, August 2, 2009

Homemade Pizza


When I think of homemade pizza I think of the pizza I grew up eating in the 60's & 70's. My mother would buy the packages of pizza crust mix, mix it up, pat it out, put on the toppings, bake and eat! These days of course we eat pizza out more often then in. But I still get a craving for the pizza of my youth. Made to order and always good. It is actually a trip down memory lane!
Time was at a premium today but I still wanted to make a hot lunch. I had everything I needed to make homemade pizza without going to the store. BONUS! So being a multi-tasker I started cooking my hamburger while paying bills with the hubby. I cooked up two pounds of beef with onions. Two pounds is way more then I needed but my intent was to get more then one meal from the meat. I planned to have loose meat sandwiches one day for lunch and then whatever was left after making the pizza went into a container that would be frozen for a future meal. (I do this regularly so that I can put together a quick lunch as needed.) Once the bills were paid, the beef was cooked and it was time to start putting it together. I'm going to list what I used for the pizza today but I'm sure your pizza will be different as mine is everytime I make one!
Homemade Pizza
Ingredients
2 pkgs of pizza crust mix
1/2 to 1 pound of beef, cooked with onion
1 can of pizza sauce (I use Contadina)
1 small can of sliced mushrooms
1/2 of small onion (the remainder from what went into the beef)
2 cups of shredded mozarella cheese
Preheat your oven to 450 degrees. Make your crust per instructions on the package. I patted it into a large cookie sheet with sides. Spread the pizza sauce over the crust. Then in whatever order you prefer, sprinkle the beef, onions and mushrooms on the pizza. Sprinkle cheese all over. Bake for 15 - 17 minutes. But keep an eye on it so the cheese doesn't start to get brown. Slice and enjoy!